
MIDI Setup


SETUP WIZARD

MIDI Setup

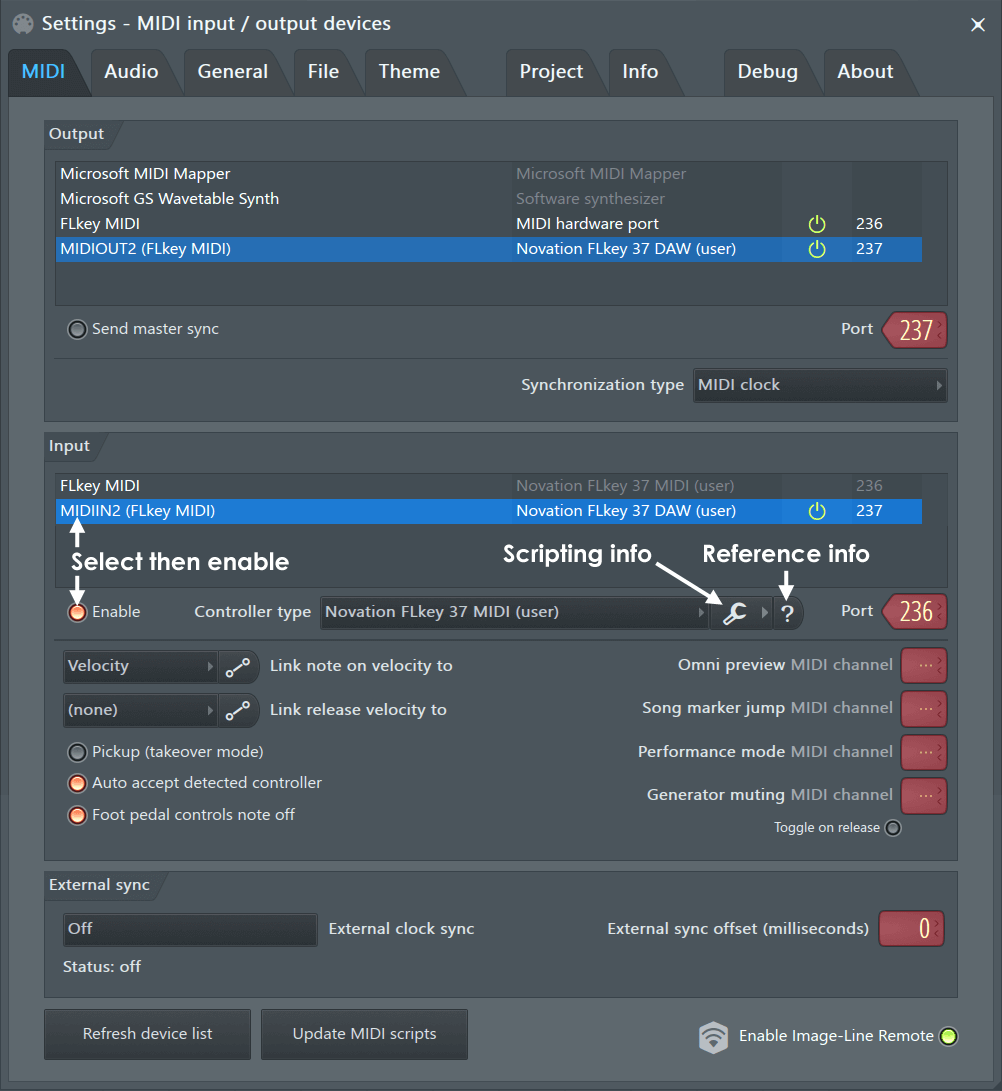
Select controllers


Click the MIDI tab in the System Settings window. This section contains a list of software and hardware MIDI devices on or connected to your system that can be used for MIDI Input/Output. For example, hardware and software synthesizers, controller keyboards and 'loopback' devices. The most common controllers used by computer-based musicians today connect with a USB cable (rather than MIDI cable) and provide a piano-keyboard, pad or mixer-style interface.

I don't have any controllers or outboard MIDI devices to connect 

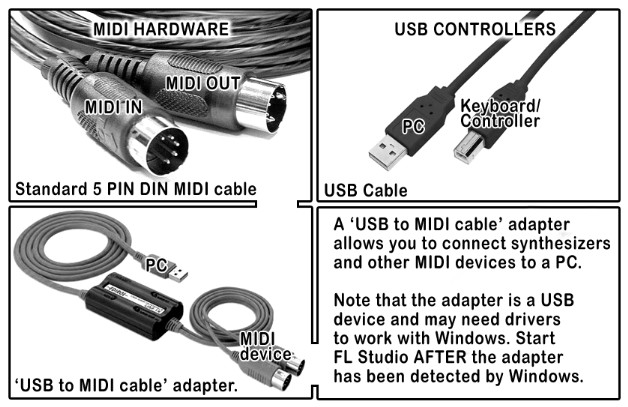
1. Connect and install your keyboard/controller/synth in Windows / macOS

MIDI is not an audio connection - The connections discussed on this page do not transfer audio, MIDI connections transfer note data, knob movements and program changes so that your controller can play software instruments and/or FL Studio can play connected MIDI hardware. To use sounds from an external synthesizer (while it is played by FL Studio) you will need to make MIDI connections (discussed here) AND audio connections to your audio device inputs so that FL Studio can record the sound/s that it triggers from the external MIDI hardware using a MIDI Out plugin.

Cable types - You will either have a USB based keyboard/controller or hardware with 5-pin DIN MIDI connectors. Click here to see these connector types compared.

  • USB connected controller - If your controller has a USB port, then it will connect directly to your PC with a standard USB cable.
    • 1. Install any USB drivers that came with your controller. Many controllers use the standard OS drivers and will appear as 'USB Audio Device (generic controller)', see the Input list.
    • 2. Connect the controller to your PC, turn it on and follow the Windows installation procedure. The standard USB 'connected ' process should happen.
    • 3. Start FL Studio AFTER the controller driver has been installed and proceed as described in the 'Setting input and output MIDI devices' section below.
  • MIDI cable connected controller - If you have a device with 5-Pin DIN connectors you will probably need to purchase a USB cable to MIDI cable adapter as shown. Most external audio devices have MIDI connector plugs on them, use those if present.
    • 1. Connect the MIDI cables to the MIDI IN and OUT ports on your MIDI interface hardware and turn it on. Make sure the MIDI OUT on the interface is connected to the MIDI IN on your MIDI device and/or the MIDI IN on the device is connected to the MIDI OUT on the MIDI interface. How many MIDI cables do I need? You need two MIDI cables if you want FL Studio to play your MIDI device and to use your MIDI device to control FL Studio. If you plan one-way communication, then you only need one MIDI cable.
    • 2. Install any USB drivers that came with your MIDI to USB adapter.
    • 3. Plug the MIDI adapter into your PC, turn it on and follow the Windows installation procedure. The standard USB 'connected ' process should happen.
    • 4. Start FL Studio AFTER the adapter driver has been installed and proceed as described in the 'Setting input and output MIDI devices' section below.

2. Set input and output MIDI devices

You may want to select an Input (a controller that plays FL Studio instruments) or Output device (something that connects to your PC and receives note data from FL Studio).

Output - Port Mapping

These options select a MIDI output interface so FL Studio can send MIDI signals to outboard gear (Synthesizer, Drum Machine, Sampler, etc). See the MIDI Settings page for more details.

Input - Connecting External Controller/s

If you have a USB/MIDI keyboard or controller that you would like to control using FL Studio, you will need to change some settings in the Input section. This contains a list of controller devices that have been detected by Windows (see section 1).

To activate a controller in FL Studio -

  1. Open FL Studio and make sure the 'Enable MIDI remote control' option is selected in the Options menu, MIDI input is disabled otherwise.
  2. Click on the device in the Input list, so that it is highlighted. If your device is listed in the Controller type drop-down menu, select it there also. If your controller does not appear by name this means it does not have custom drivers. If so, use the 'USB Audio Device (generic controller)'. If you do not see any options, you will need to re/install the appropriate drivers for your controller.
  3. With the controller highlighted select the Enable switch below the Input list. Each device selected in the Input list must be selected/deselected separately.
  4. If successful the MIDI activity light on the Main Panel will blink each time you play notes or move knobs on your controller. NOTE: If the 'Debug log' is open any MIDI data received by FL Studio is displayed and logged, useful for learning the MIDI CC numbers of controls or troubleshooting connections.

NOTE: For more detailed information on the rest of the settings in this section and further details on supported controllers go to the MIDI Settings page.

Troubleshooting

  • Nothing appears in the Input box? - Did you connect/start your controller AFTER opening FL Studio? It is necessary that your operating system has detected your controller BEFORE opening FL Studio. Close FL Studio, turn your controller off and on (unplug and reconnect the USB cable if it does not have a switch), wait for it to be detected by the PC (Windows makes a 'connected' sound when it successfully detects a USB device), then start FL Studio.
  • Items appear but don't respond - Click the Rescan MIDI devices button and then enable the device. If that does not work, close FL Studio, turn your controller off and on (unplug and reconnect the USB cable if it does not have a switch), wait for it to be detected by the PC (Windows makes a 'connected' sound when it successfully detects a USB device), then start FL Studio.

Velocity curve

If you are using a MIDI Keyboard or Pad Controller then click on the Link note on to: Velocity Curve button. Here you can fine-tune the relationship between MIDI input velocity (how fast/hard you strike the keys/pad) and the velocity value sent to instruments.

Comments

Popular posts from this blog

Primary Sound Driver Setup

  SETUP WIZARD Primary Sound Driver Setup Adjust the buffer settings The  DirectSound devices  options will show information about the buffer length (latency) and some other settings used by the audio device driver. The buffer is a 'breathing space' in which FL Studio can generate sound before sending it to the audio device. Shorter settings make FL Studio more responsive to live inputs (e.g. mouse or  hardware controllers ) at the expense of a higher CPU load, and possibly  underruns . Select a Windows DirectSound Driver  - From the drop-down menu select a driver, usually ' Primary Sound Driver '. Set the buffer length : Use the slider to change the buffer length. Longer buffer settings mean lighter CPU load and more stable performance without  underruns  (clicks and pops in the audio). A setting of around 20-40 ms is a good starting point, most users do not notice improved responsiveness below 10 ms, however the 'Primary Sound Driver' usually struggled to deli

Options & Settings (Press F10)

  OPTIONS & SETTINGS Options & Settings (Press F10) Press the F10 function key or select the  Options Menu  to open the  System Settings  window and  Global Project Options . Global settings saved for FL Studio itself, not in  FL Studio project files (FLP) . NOTE:  If the system settings icons are not visible in the side bar on left of the screen, click the  System  button in the top-left corner of the window to expand the section. System Settings Select the icons down the left side of the window. These are global options and settings, affecting all projects. MIDI Settings  - Note & controller Input / Output settings. Audio Settings  - Audio interface & FL Studio audio settings. General Setting  - FL Studio environment settings File Settings  - Load / Save folder settings. Project Settings These are project specific settings and will only apply to the currently loaded project. Project Settings  - Project specific options & settings Project information  - Save projec